
Caramelized Onion and Goat Cheese Quiche
1 standard pie crust
2 red onions
1 tbs balsamic vinegar
4-8 oz goat cheese (depending how cheesy you want it, or how big the packet of goat cheese you bought happens to be... I'd tend towards more than less, but it's really up to you. I usually just put in the whole chunk of goat cheese I purchased.)
3 large eggs
1/2 cup milk
1/2 cup cream
nutmeg
salt and pepper
cayenne pepper (optional, to taste)

 Onions: I put this step first because it takes the longest, but while the onions are cooking, you should deal with pre-baking your pie crust, as well. But to get a nice caramelization going on your onions, you need to cook them slowly, over the course of about an hour. First, french your onions. If you are not familiar with this term, that's OK, I wasn't either when I made this recipe for the first time. What you are going for is long, thin strands of onion. So, chop of the top and bottom of the onion, and peel it. Next, slice the onion in half, down the length of the it (from the top to the bottom), like an orange splits. Then, in the same direction, cut thin slices off of the onion, so you get nice long slices - see the picture to the left! Once your onions are all frenched up, put some olive oil in a pan on medium heat. Add the onions, sprinkle some salt over them, and cook for 10 minutes until they're starting to become soft and translucent. At this point, reduce the heat to LOW, and cook for about 30 minutes more (moving them around occasionally) until they're becoming brown and very soft. Add the balsamic vinegar and mix well, and cook 10 minutes more on low until they're caramelized and delicious! Then remove from heat and set aside.
Honestly, these onions are delicious by themselves, but take a while. So if you think you'll have use for them, you may as well cook some extras up while you are doing this. They're really good, sweet, even, and consider that they're basically onions and vinegar. Mind, it IS balsamic vinegar, the most delicious vinegar ever! Silly though it may be, I still remember the first time I had it balsamic as a salad topping, at a German restaurant in DC - I was just amazed at how tasty the stuff was, and insisted my parents buy some right away for the next time we had salad at home. But then, I do tend to have a memory for food - seriously, I can completely forget a face I've met only once, but take me to a restaurant I've been to once before, and I'll tell you exactly what I ate and how I liked it. Ah well.

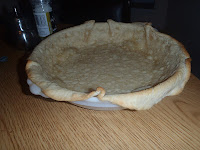
Pie Crust: Preheat your oven to 400F. Make up your pie dough. Now here, I admit I cheat a bit. I don't actually make my own pie crust very often. I've made it via a mix, and I've made it when baking with friends who have their own recipes, but when I'm just cooking for myself, I generally cheat and buy frozen Pillsbury pie dough - it's pie dough, NOT pre-baked (as those tend to get dry), which you can cut up, or pre-bake yourself, or whatever you want to do with your pie crust. I pretty much always have a box in my freezer for spontaneous pie or quiche. Very useful! Anyways, once you have your pie crust dough, fit it into a standard pie pan. If you don't have a pie pan, I have, in the past, improvised and used a 8-inch circular cake pan, which will work just fine - however, I generally use my grandmothers pie pan, much easier to deal with. At this point, if you happen to have them, you can weight the crust down with pie weights. Alternatives include dried lentils, or beans, or whatever - the point is to prevent the bottom from puffing up and deforming while the crust bakes - I generally skip this step and it works out fine, but it certainly doesn't hurt to do. Pre-bake for 10-15 minutes (or whatever your pie recipe calls for) until its a nice, light brown. It will be going back in the oven later, with quiche in it, so don't over do it or the outer crust will get a little too toasty. (Mmm... toasty.). Let cool.
Filling and Baking: Preheat the oven to 325F. Blend milk, cream, egg, spices, and up to half the cheese until liquified and homogenous. Take your onions, and spread about half of them on the bottom of your pie crust, and crumble some more of the goat cheese on top of that. (In this particular pie, I was using 4 oz of goat cheese total - 2 oz in the blender, 1 oz on the bottom, and 1 oz sprinkled on top. I generally use a little more, but that's what I had around today.) Then pour your filling into the tart. Top with the rest of the onions and goat cheese (it will sink into the pie as you bake it, but you want it layered a bit). Bake for ~45 minutes until starts browning on the top - it's a good idea to check on it every so often, as you don't want it getting overdone, either.
This is friggen' delicious. My department has 'morning coffee' twice a week, with people rotating to bring in snacks to go with coffee, which I like to volunteer for every once in a while. Of the various things I bring in, this is definitely one of the most popular. I also like to bring in homemade bread with my bread machine, since usually one quiche by itself wouldn't be enough for everyone (and it tends to disappear FAST). On this occasion, however, I made it all for myself (and for my roommate, who made up a nice salad to go with it), for dinner and a nice lunch tomorrow.


Pie Crust: Preheat your oven to 400F. Make up your pie dough. Now here, I admit I cheat a bit. I don't actually make my own pie crust very often. I've made it via a mix, and I've made it when baking with friends who have their own recipes, but when I'm just cooking for myself, I generally cheat and buy frozen Pillsbury pie dough - it's pie dough, NOT pre-baked (as those tend to get dry), which you can cut up, or pre-bake yourself, or whatever you want to do with your pie crust. I pretty much always have a box in my freezer for spontaneous pie or quiche. Very useful! Anyways, once you have your pie crust dough, fit it into a standard pie pan. If you don't have a pie pan, I have, in the past, improvised and used a 8-inch circular cake pan, which will work just fine - however, I generally use my grandmothers pie pan, much easier to deal with. At this point, if you happen to have them, you can weight the crust down with pie weights. Alternatives include dried lentils, or beans, or whatever - the point is to prevent the bottom from puffing up and deforming while the crust bakes - I generally skip this step and it works out fine, but it certainly doesn't hurt to do. Pre-bake for 10-15 minutes (or whatever your pie recipe calls for) until its a nice, light brown. It will be going back in the oven later, with quiche in it, so don't over do it or the outer crust will get a little too toasty. (Mmm... toasty.). Let cool.
 |
| Onions and Goat cheese on the bottom |
 |
| Filled, not baked, and topped with the remaining onions and goat cheese |
This is friggen' delicious. My department has 'morning coffee' twice a week, with people rotating to bring in snacks to go with coffee, which I like to volunteer for every once in a while. Of the various things I bring in, this is definitely one of the most popular. I also like to bring in homemade bread with my bread machine, since usually one quiche by itself wouldn't be enough for everyone (and it tends to disappear FAST). On this occasion, however, I made it all for myself (and for my roommate, who made up a nice salad to go with it), for dinner and a nice lunch tomorrow.


